Layer Palette
The Layer Palette provides a view of your mandala as a stack of layers. It allows you to select a layer in your drawing, hide or show layers, rearrange the layers, and delete layers.
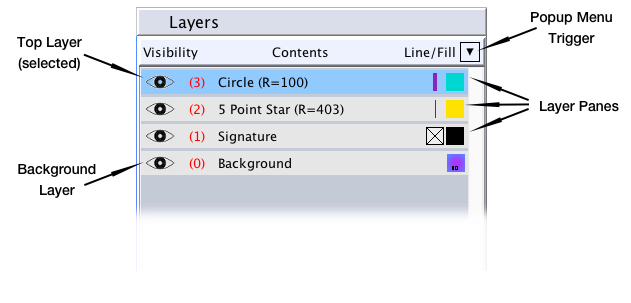
When you create a new mandala document, it already has one layer: the Background layer. The Background is displayed in the Layer Palette as a Layer Pane.
As you create new layers by pressing the New Shape button or the New Text button, new Layer Panes appear at the top of the Layer Palette, representing the new shape or text objects.
Layer Panes
Layer Panes represent the the individual elements of your mandala. Each pane contains a visiblility control, a verbal description of the layer that the pane represents and also swatches depicting the Line and Fill Paints of the object.
Information in the Layer Pane will be dynamically updated as you make changes to the layer.
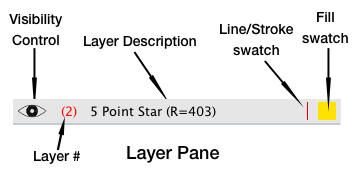
Visibility Control
The Visibility Control looks like an eye. When a layer is visible, the eye is open. When the layer is hidden, the eye is closed. Clicking on the eye toggles the visibility of the layer. Layers will not print or export while invisible, but they are still part of the mandala and will be saved in MandalaMaker files.
Layer Description
The Layer Description provides a short description of the layer content. For Shape layers, this includes the name of the shape and some attribute information to make identifying the shape easier. For example, in the illustration the Star's layer pane is displaying the number of points (3) and also the Radius (R=100). Text Layers display "Text:" followed by the first fifteen characters of the content. The Background Layer is simply labeled "Background."
Line/Stroke Swatch
The Line/Stroke Swatch indicates the layer object's Line Paint and relative stroke size. If there is no Line Paint, the Line/Stroke Swatch will display the blank swatch ( ![]() ).
).
Fill Swatch
The Fill Swatch displays the layer object's Fill Paint. If there is no Fill Paint, the Fill Swatch will display the blank swatch ( ![]() ).
).
Selecting a Layer
If you click on a Layer Pane in the Layer Palette the layer that is represented by that Layer Pane will become the selected layer. The Layer Pane will be highlighted in blue and selection handles will appear on the selected object on the Canvas.
Once a layer is selected, any adjustments made on relevant palettes will alter the selected layer. The selected layer can also be adjusted by dragging its selection handles as described in Working with Shapes and Working with Text.
Only one layer may be selected at a time, so selecting a layer will deselect any previously selected layer.
The Background Layer can not be selected, however, it's paint can be changed at any time by clicking the Back Paint Swatch of the Line & Fill Palette.
Selecting a Compound Shape
In the case of Compound Shapes — the Planet, Ring of Shapes, Grid of Shapes or Matrix of Shapes — there are two modes of selection:
As described in the Canvas section, different selection handles appear when the component shape is selected, which allow the ringshape's attributes to be adjusted by dragging them.
Stacking Order
The order of the Layer Panes within the Layer Palette represents the stacking order of your shapes, with the top layer at the top of the palette and so on down to the Background layer at the bottom of the palette.
You can change the stacking order of the layers by dragging a Layer Pane up or down within the Layer Palette.
When you drag a Layer Pane, the blue highlight of the other panes will indicate where the moving pane will end up when you drop it. If you are moving the pane down, the moving pane will end up below the hightlighted pane. When moving a pane up, the moving pane will end up above the highlighted pane.
Note that the Background Layer can't be moved, and that no layer can be dragged below it.
Pop-up Menu
The Layer Palette has a Pop-up Menu which can be accessed by clicking on its trigger, the arrow icon in the upper right of the palette. The menu contains some useful commands:
Commands similar to the first three above are also available on the Edit Menu.
 HOME
HOME