MandalaMaker™ Tutorial
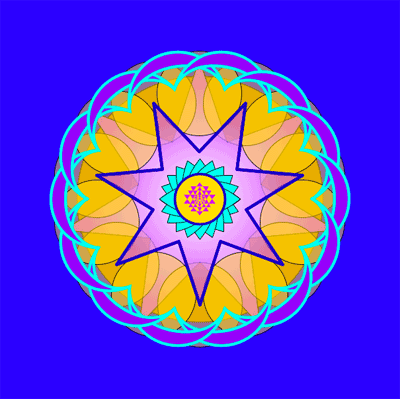
This section provides a tutorial which will walk you through many of MandalaMaker's features as we together create the mandala shown at the right. You might want to print out this frame so you can follow along more easily.
The tutorial is arranged in numbered steps. The primary instructions for each step are in bold blue text. Explanatory notes appear in regular text.
The Figures are derived from screen shots taken on a Mac with a relatively small screen. If you are a Windows user or have a large screen, what you see on your screen will vary somewhat from the Figures, but the basic placement of controls and palettes will be essentially the same.
Starting the Program
1. Launch MandalaMaker (instructions here).
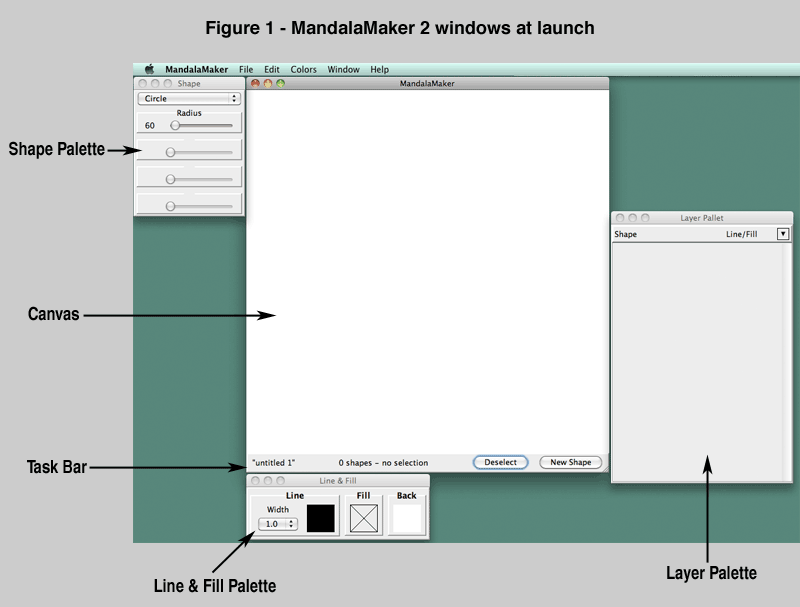
When the program opens, you will see the program windows arranged as in Figure 1.
Adding our First Shape
2. Click the New Shape button, located at the right end of the Task Bar.
A new Circle will appear on the Canvas as shown in Figure 2. In addition, a box representing the new shape will appear on the Layer Palette.
Whenever the New Shape button is clicked, a new shape is added as the top layer of the drawing. The type and configuration of the shape so created will match the settings in the Shape Palette, Line & Fill Palette, and other palettes which we will come to later.
In this case, since we have not made any changes in the palettes, the initial settings are used, creating a Circle with a Radius of 60, a 1 pixel black line and no fill.
Note that the new Circle is selected, which is indicated by the presence of selection handles, and the text of the Mandala Status on the Task Bar.

Resizing the Shape by Dragging
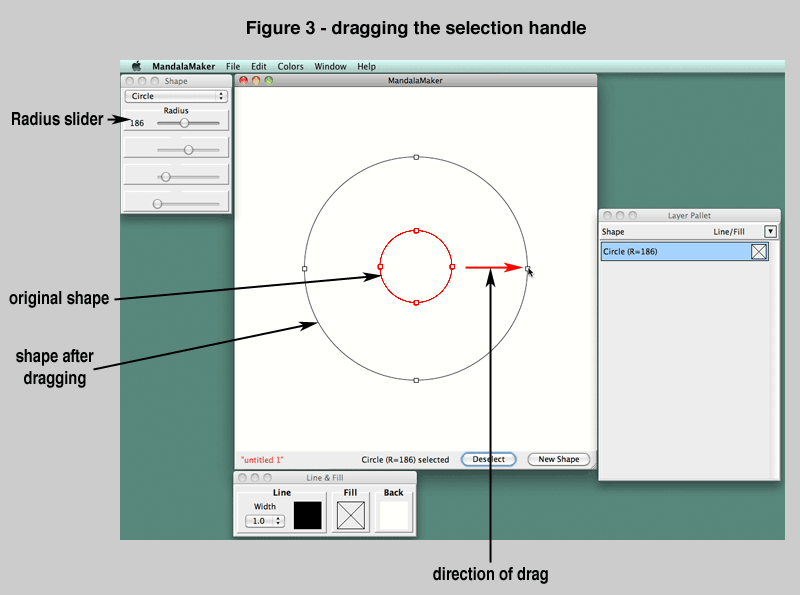
3. Place the cursor over the selection handle at the 3-o'clock position of the Circle and drag away from the center of the Circle.
The Circle's Radius will grow with your drag action as shown in Figure 3.
4. As you drag, watch the Radius number displayed on the Radius slider of the Shape Palette. Stop Dragging and release the mouse button when the Radius is approximately 186.
5. Click once on the Radius slider in the Shape Palette to select it. Then use the Up and Down arrows (↑ and ↓) on your keyboard to set the Radius to exactly 186.
Note that you can change the Radius of the Circle in several ways. You can drag the selection handles as we did in step 3, but you could also have dragged the Radius slider itself. As we saw in step 5, once the Radius slider is activated by clicking on it, the Radius can be adjusted using your keyboard's arrow keys.
Be Aware:
When attempting to drag a selection handle as in step 3 above, you must place the tip of the cursor arrow precisely over the selection handle in order to "grab" it correctly.
Changing the Fill Color
In order to change the attributes of a shape, the shape must be selected.
If you are following the tutorial instructions, your Circle should already be be selected. You can tell it is selected because the selection handles will be visible, and because the Shape Pane in the Layer Palette will be highlighted in blue.
If your shape is not selected, click on it's Shape Pane in the Layer Palette to select it before proceeding with step 6.
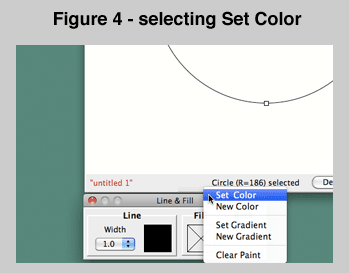
6. Place the cursor over the Fill swatch on the Line & Fill Palette.
7. Click the mouse button to activate the Popup Menu.
8. Move the cursor to the "Set Color" command and click the mouse button.
The Popup Menu is shown in in Figure 4 at right.
When you click the Set Color command, the Paint Palette will appear to the right of the Line & Fill Palette as shown in Figure 5.

9. When the Paint Palette opens, move the cursor over the sixth color swatch from the left on the top row.
10. Click the mouse button to fill our Circle with this color.
Note when you click that the Circle becomes filled with the chosen color and that the Fill Swatch on the Line & Fill Palette also reflects you choice.
The Paint Palette will remain open and, if you are feeling adventurous, you can click on other swatches to try out other fill colors for the Circle.
11. Once the Circle's fill color has been set as you wish, click the "Done" button on the Paint Palette to close the palette.
Deselecting the Shape
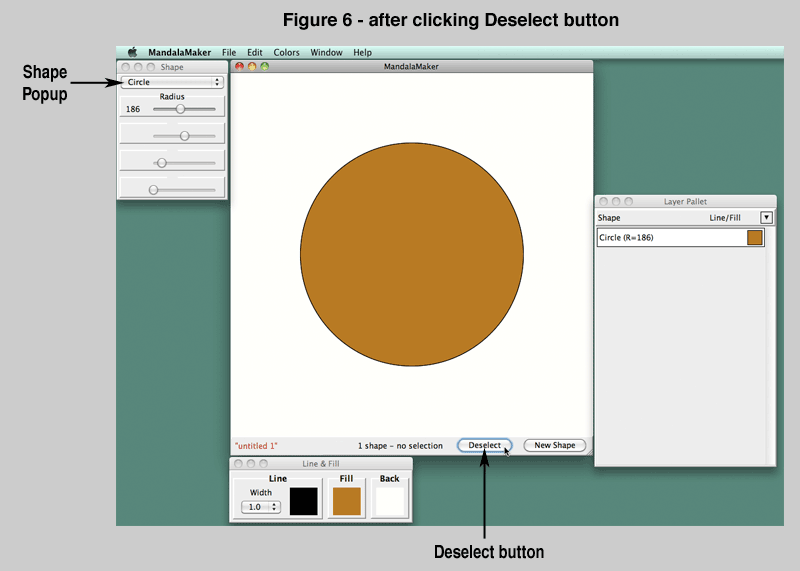
12. Click the "Deselect" button on the Task Bar.
The Circle will be deselected. It's selection handles will disappear and it's Shape Pane in the Layer Palette will lose it's blue highlight.
Figure 6 shows the state after the Deselect button is clicked. Note that the settings of the Shape Palette and Line & Fill Palette remain unchanged. However, as you will see in the next step, changes made to the palettes no longer effect the deselected Circle.
A shape can be deselected in a number of ways:
Choosing a new Shape Type
13. Place the cursor over the Shape Popup on the Shape Palette and click the mouse button to open the Shape Popup Menu.
The Shape Popup is labeled in Figure 6 above.
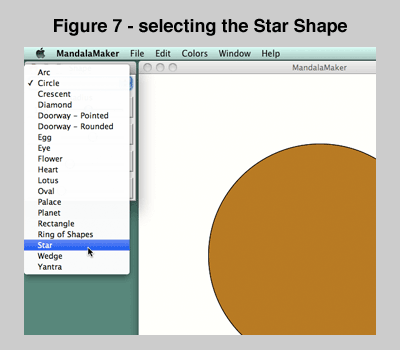
14. Slide the cursor down to the Star item and click to choose this shape.
The action of choosing Star is shown in Figure 7.
Adding the Second Shape
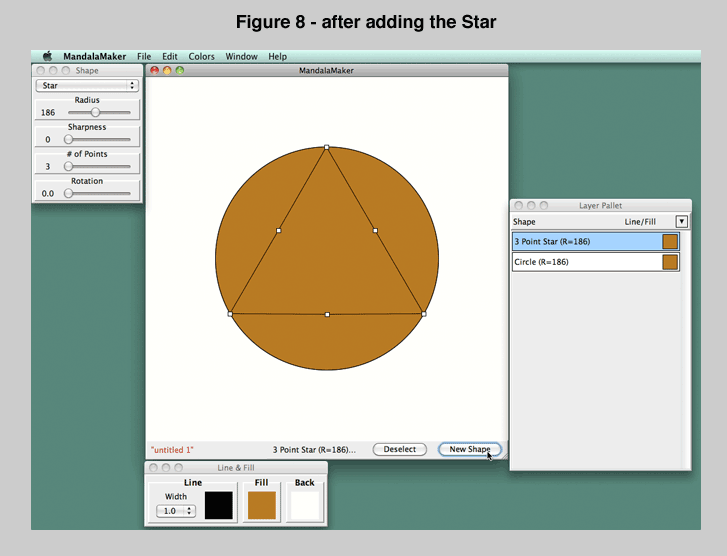
15. Click the "Add Shape" button to add a Star to the mandala.
A new Star shape appears on the Canvas as shown in Figure 8.
Note that the Radius and color scheme of the new shape match the settings in the palettes left over from our Circle. The # of Points and Sharpness attributes are set to their default minimum values.
Setting the Star Attributes
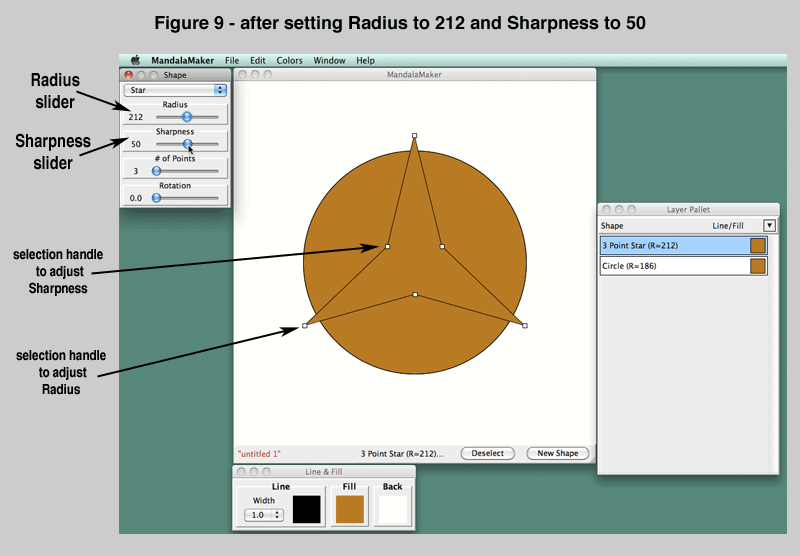
16. Place the cursor over the Radius slider and drag the handle until the Radius is 212. If you have trouble setting the Radius exactly, you can use the ↑ and ↓ keys on the keyboard to move the slider one number at a time.
17. In the same way that you adjusted the Radius in the last step, use the Sharpness slider to set the Sharpness of the Star to 50.
Figure 9 shows the state after step 17.
Note that the Sharpness can also be changed by dragging one of the selection handles at the midpoints of the shape's sides, and that the Radius can be adjusted by dragging one of the selection handles at the points of the shape.
18. In the same way that you adjusted the Radius and Sharpness, set the "# of Points" slider to 7.
Setting a Gradient Fill
19. Place the cursor over the Fill swatch on the Line & Fill Palette. Click the mouse button to open the popup menu.
20. Place the cursor over the "Set Gradient" item on the popup menu and click to open the Paint Palette.
Figure 10 illustrates choosing the Set Gradient command.

The Paint Palette will open displaying it's Gradient tab.
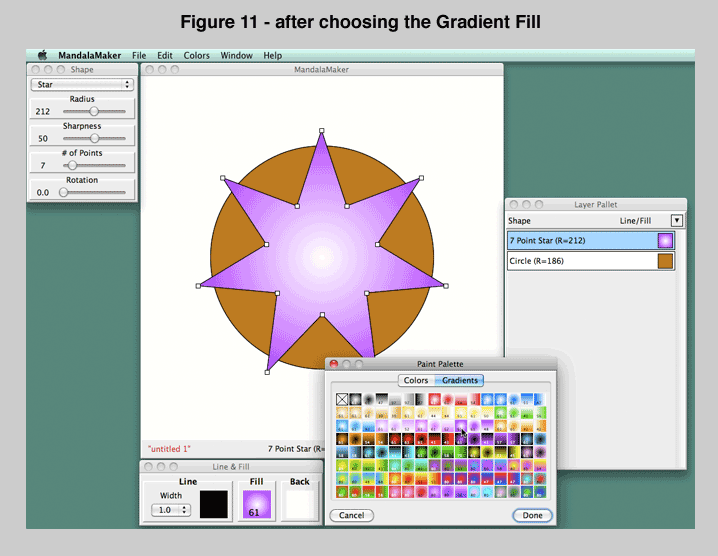
21. Move the cursor over the purple radial gradient (the 10th swatch from the left on the third row) and click to set the Star's fill to this paint.
Figure 11 illustrates the state after setting the fill. Feel free to click on other swatches to see how the various gradients look when applied to the Star.
22. When the fill is set to the chosen gradient, click the "Done" button on the Paint Palette to close the palette.
Saving the File
Now that we have added a couple of shapes to our mandala, it would be a good idea to save our work.
The File Name item at the left end of the Task Bar indicates the Save status of your mandala by the color of the text. When it is red, the mandala is unsaved, or has unsaved changes. When it is black, the mandala is saved as it appears.
23. Move the cursor over the File Item on the Menu Bar. Click to open the File Menu. Slide the cursor down to the "Save…" command and click to open the Save Dialog box.
On Windows systems, the Menu Bar will appear at the top of the Canvas window, on Mac systems it will appear at the top of your screen.
When you choose Save… a system native Save Dialog will open.
24. Type in "tutorial" as the file name.
Depending on your system and configuration, you may see the extension .mmk appended to your file name. If it is present, you should retain it when naming your file. If it is not present, MandalaMaker will add it when the file is saved. All of your native MandalaMaker files should have this extension, so that MandalaMaker can recognize them.
25. Using the file browser in the dialog choose a location in which to save your mandala.
It is very important to choose a logical place to save your MandalaMaker files so that you will be able to find them later. If you are unfamiliar with choosing file locations in a Save dialog, you should refer to your operating system documentation.
26. Once your file is named and you have chosen a proper location for it, click the Save button in the dialog.
Your mandala is now saved to disk. Note that the File Name item now reflects your chosen file name and that the text appears in black, indicating that the mandala is saved.
Adding a new Shape based on the Selected Shape
So far we have added shapes when none existed or when there was no selected shape. It is also possible to add a new shape while another shape is selected. When this is done, the new shape will be a perfect clone of the selected shape.
27. While the Star we just created and edited is still selected, click the "Add Shape" button.
It may appear that nothing happened, but actually a new shape which is an exact duplicate of our Star has been created on top of the original one and the new Star is now the selected shape.
If you look at the Layer Palette, you will see that there are now two Stars in our mandala.
You may also note that the File Name item in the Task Bar turned from black to red when you added the new shape. This indicates that, although the mandala was saved, our working drawing is now out of sync with the saved file.
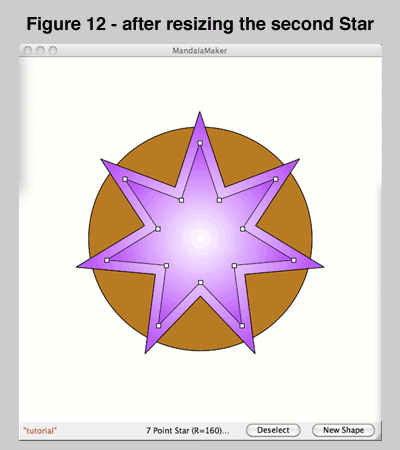
28. Place the cursor over the Radius slider on the Shape Palette and drag it so the Radius value is 160.
Figure 12 shows the state of the image after step 28. You can now see clearly that there are two Stars in our drawing.
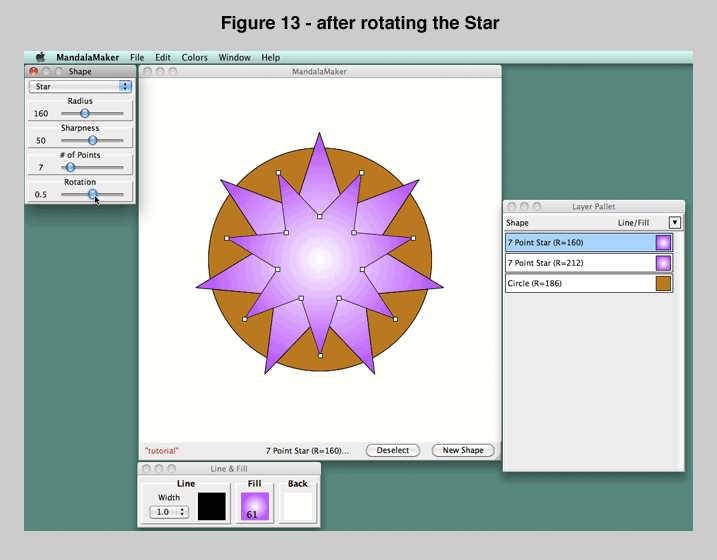
29. Place the cursor over the Rotation slider on the Shape Palette and drag it until the Rotation is set to 0.5. Remember you can use the ↑ and ↓ keys to adjust it exactly.
Figure 13 shows the result after step 29.
Note that you can also adjust the Rotation by dragging one of the Star's selection handles while holding down the Alt/Option Key on your keyboard.
Adding Transparency to a Gradient
Transparency is a powerful design tool that's new in MandalaMaker 2. Both solid colors and gradients can have transparency applied.
 Gradients consist of two colors blended, and each of the colors has it's own transparency level. Therefore, in order to add transparency to a gradient, we must access the gradient's colors through the Gradient Palette.
The Gradient Palette is accessed by choosing New Gradient from the Line & Fill Palette's swatch popup menus.
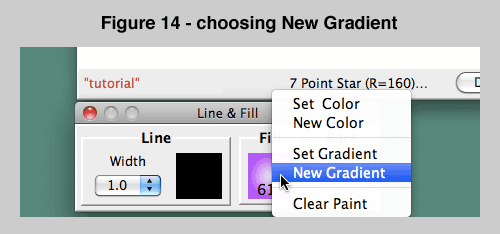
30. Place the cursor over the Fill swatch on the Line & Fill Palette and click the mouse button to open the popup menu.
31. Click on the "New Gradient" item in the popup menu to open the Gradient Palette.
Figure 14 illustrates choosing the New Gradient item in the popup menu.
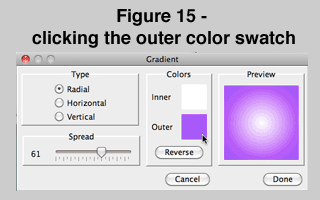
32. When the Gradient Palette opens, place the cursor over the Outer color swatch and click the mouse button to open the Color Picker.
Figure 15 illustrates choosing the Outer color swatch.
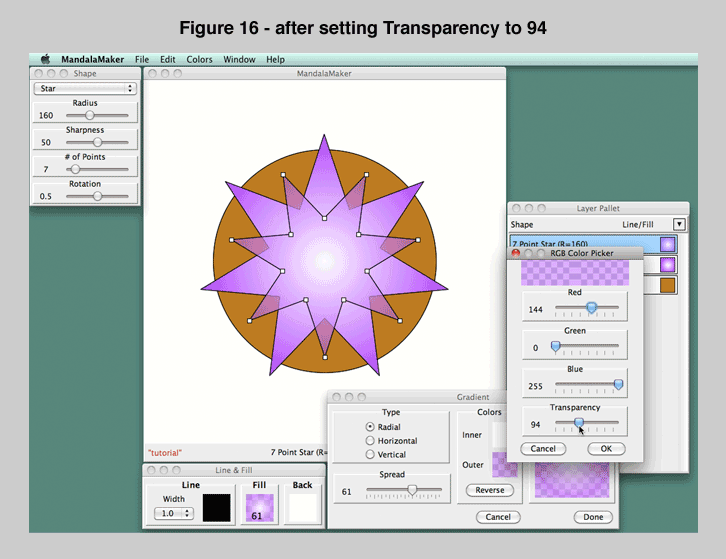
33. When the Color Picker opens, place the cursor over the Transparency slider and drag it until the Transparency value is 94.
Figure 16 shows the state after step 33.
34. Click the "OK" button on the Color Picker to close the picker.
35. Click the "Done" button on the Gradient Palette to close the palette.
36. Now that we have added another shape, select "Save" from the File Menu (or use the keyboard equivalent) to save the changes to your drawing.
Adding a Ring of Shapes
37. Click the "Deselect" button on the Task Bar to deselect the Star.
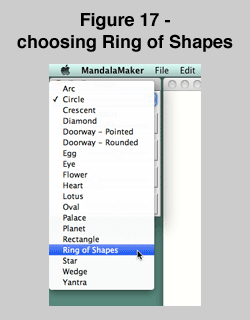
38. Open the Shape Popup Menu on the Shape Palette and click on the "Ring of Shapes" item.
Figure 17 illustrates choosing Ring of Shapes from the Shapes Popup Menu.
Note that the Ring Shape Palette opens below the Shape Palette. The Ring Shape Palette controls the attributes of the shapes in the Ring (currently Circles), while the Shape Palette controls the attributes of the Ring as a whole.
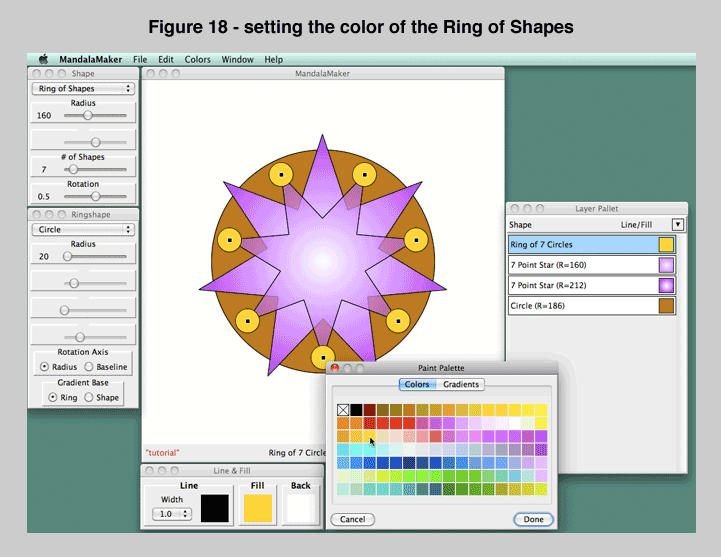
39. Click the "New Shape" button on the Task Bar to add the Ring of Shapes to the mandala.
40. Click on the Fill swatch on the Line & Fill Palette to open the popup menu, and choose the "Set Color" item.
41. When the Paint Palette opens, click on the yellow swatch third from the left on the third row to set the color of the Ring's fill.
Figure 18 shows the state after setting the fill color.
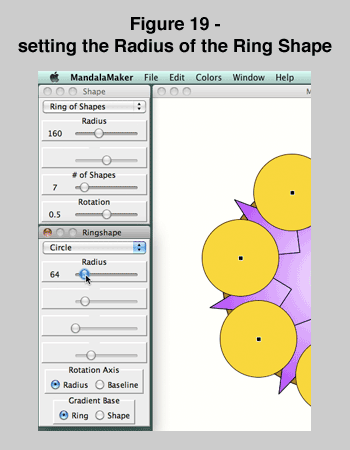
42. Place the cursor over the Radius slider on the Ring Shape Palette and drag it until the Radius is set to 64.
Figure 19 illustrates setting the Radius of the Ring Shape.
Setting Color Transparency
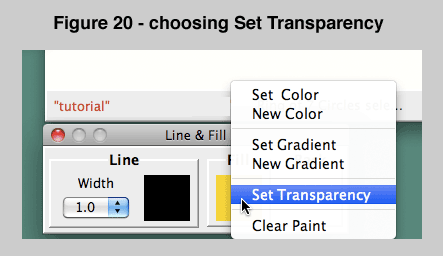
43. Click on the Fill swatch on the Line & Fill Palette to open the popup menu, and choose the "Set Transparency" item.
Figure 20 illustrates choosing Set Transparency.
The Transparency Palette will open to the right of the Line & Fill Palette.
44. When the Transparency Palette opens, place the cursor over the Transparency slider and drag it until the Transparency is set to 120.
Figure 21 shows the state after setting the Transparency.
45. Click the "Done" button on the Transparency Palette to close the palette.

Adding a second Ring of Shapes
46. While the current Ring of Shapes is still selected, click the "New Shape" button to duplicate the shape as you did with the Star in step 27.
A new Ring of Shapes is created directly on top of the previous shape.
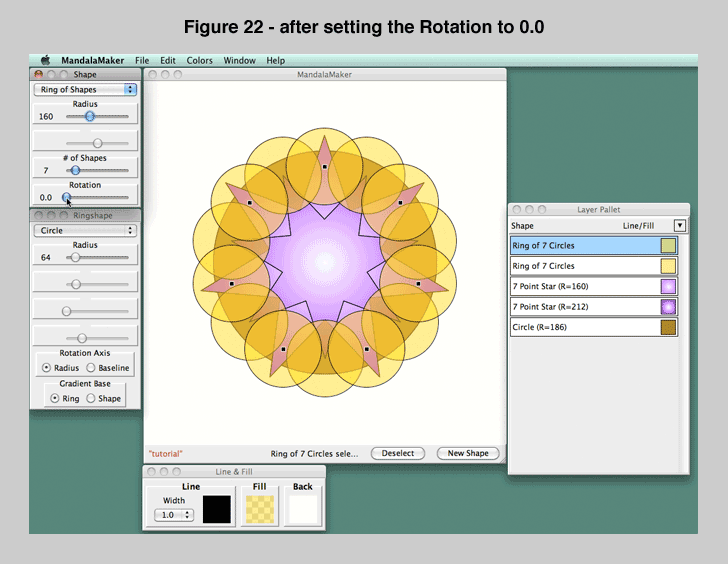
47. Place the cursor over the Rotation slider on the Shape Palette and drag it until the Rotation is set to 0.0.
Figure 22 shows the state after setting the Rotation.
Changing the Stacking Order of the Layers
As your design evolves, it is often advantageous to be able to change which shapes are in front or behind other shapes. This can be accomplished by dragging the Shape Panes within the Layer Palette.
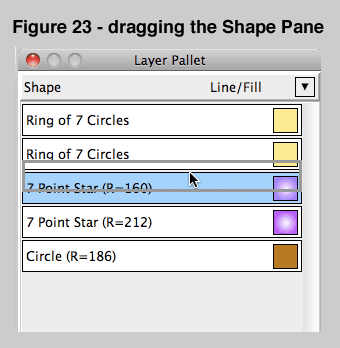
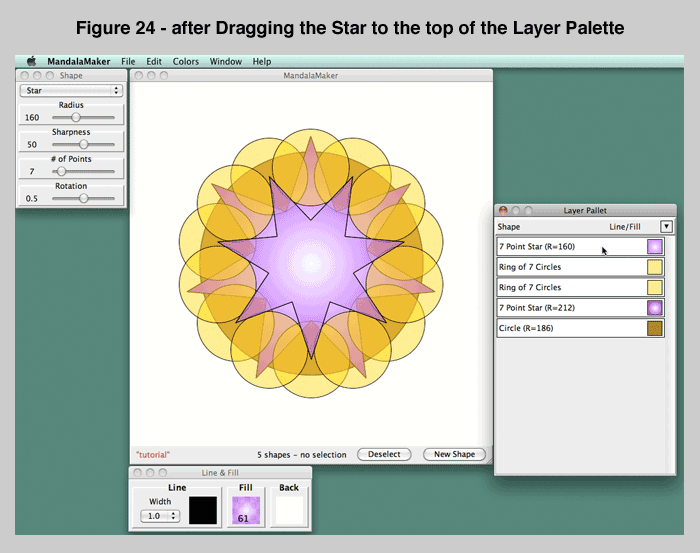
48. Place the cursor over the Shape Pane for the 7 Point Star (R=160) in the Layer Palette (the third Shape Pane down from the top).
49. Click and hold down the mouse button as you drag the Shape Pane upward until it is over the top Pane labeled Ring of 7 Circles.
Figure 23 illustrates dragging the Shape Pane.
50. When the top Ring of 7 Circles is highlighted in blue, release the mouse button to drop the 7 Point Star into the top position.
Figure 24 shows the state after dragging the Star to the top position. Notice that the Star now appears in front of the Rings of Circles in your mandala.
Setting the Background Color
The background color can be changed at any time while creating your mandala. Both solid colors and gradients can be used.
Changing the background can have a dramatic effect on the look of your image.
51. Place the cursor over the Back swatch on the Line & Fill Palette and click to open the popup menu.
52. Choose "Set Color" from the popup menu to open the Paint Palette.
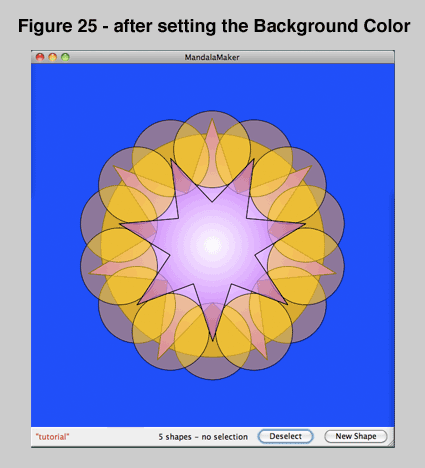
53. When the Paint Palette opens, click on the blue swatch fourth from the left on the fifth row to set the background to this color.
Figure 25 shows the mandala after setting the background color. Feel free to click on other swatches to see the effects of different backgrounds on your image.
54. Once the background color is set, click the "Done" button on the Paint Palette to close the palette.
55. Now is a good time to save the changes we have made in the mandala. Select "Save" from the File Menu (or use the keyboard equivalent).
I won't remind you again in the instructions, but you should Save after every few steps to be sure that your work will not be lost.
Setting the Line Color
56. If the Star that we moved to the top is not selected, select it by clicking on it's Shape Pane in the Layer Palette.
57. Place the cursor over the Line swatch on the Line & Fill Palette and click to open the popup menu. Choose "Set Color" on the menu to open the Paint Palette.
58. When the Paint Palette opens, click on the dark blue swatch fifth from the left on the fifth row to set the Star's Line to this color.
59. Click the "Done" button on the Paint Palette to close the palette.
Setting the Line Width
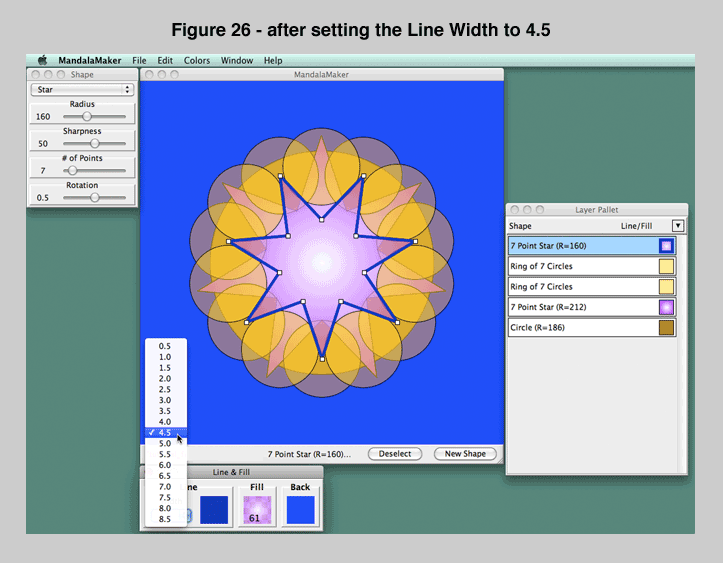
60. Place the cursor over the Line Width popup on the Line & Fill Palette and click to open the popup menu.
61. Move the cursor down to 4.5 and click to set the Line width of our Star.
Figure 26 shows the state after setting the Line Width.
Creating a Transform
Transforms are a great way to add complicated groups of shapes to your drawings quickly and easily. We begin by creating a new shape.
62. Click the Deselect button on the Task Bar to deselect the Star.
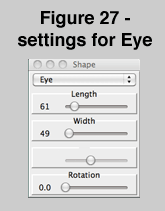
63. Using the Shape popup menu on the Shape Palette choose the "Eye" shape. Refer to steps 13 and 14 if you are unsure how to do this.
64. Drag the sliders on the Shape Palette to set the Length to 61, the Width to 49 and the Rotation to 0.0.
Figure 27 shows the settings of the Shape Palette after step 64.
65. Click the "New Shape" button on the Task Bar to add an Eye to your drawing.
66. Turning our attention to the Line & Fill Palette, use the Line Width popup to set the Line width to 1.0.
67. Click on the Line swatch and choose "Set Color" on the popup menu. Click on the black swatch to set the Line color. Refer to steps 6 - 11 for a more specific procedure for setting colors.
68. Click on the Fill swatch and choose "Set Color" on the popup menu. Click on the light blue swatch second from the left on the fourth row to set the Fill color.
69. Place the cursor over the "Window" item on the Menu Bar and click to open the menu. Choose "Show Transform Palette" on the menu.
The Transform Palette will appear above the Layer Palette. Figure 28 shows the state after showing the Transform Palette.
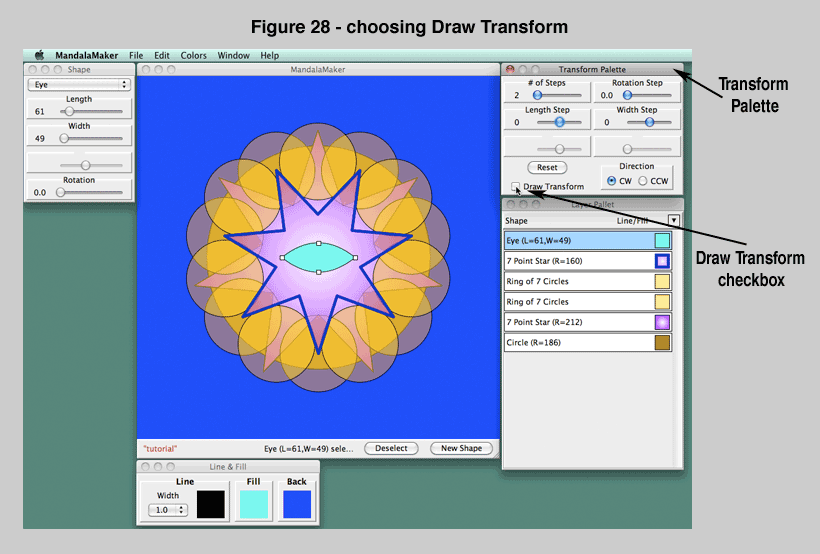
Now we will change the shape into a Transform.
70. Click on the "Draw Transform" checkbox in the lower left corner of the Transform Palette.
When we check the Draw Transform checkbox, we are telling MandalaMaker to pay attention to the settings on the Transform Palette and to draw a Transform rather than a single shape.
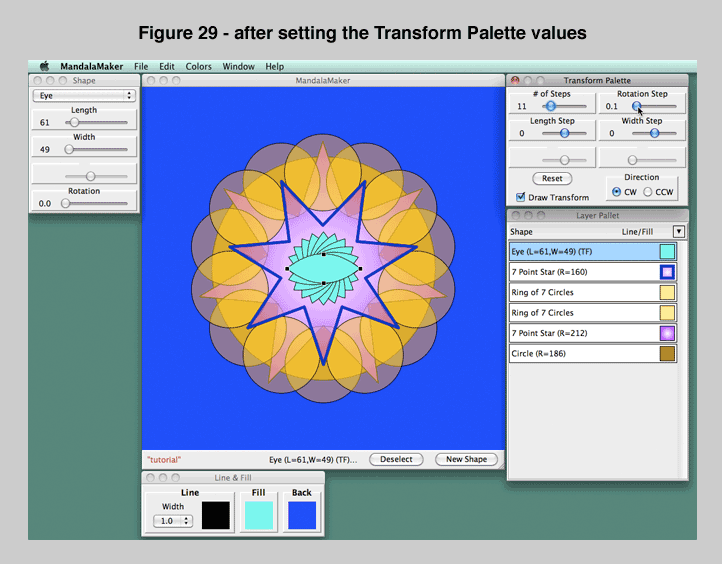
Initially you will see no difference in your image because the Step sliders are set to zero values.
71. Drag the sliders on the Transform Palette to set the "# of Steps" to 11 and the "Rotation Step" to 0.1.
Figure 29 shows the state after step 71.
Feel free to play with the sliders on the Transform Palette to see what kinds of effects are possible.
72. When the Transform values are set correctly, click the "Deselect" button on the Task Bar to deselect the Transform.
73. Click the Close button on the Transform Palette or choose "Hide Transform Palette" from the Window Menu to hide the palette.
Adding another Shape
Let's add another shape.
You should be getting a pretty good feel for using the program controls by now, so this time I will just tell you what shape to create.
We've done all the steps before, so if you run into problems, look at the steps we went though above.
74. Be sure that you have no selection.
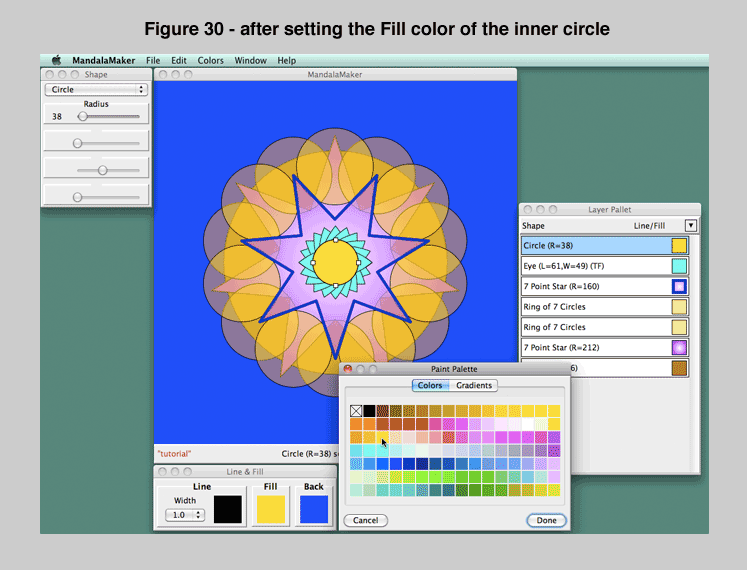
75. Add a Circle with a Radius of 38.
76. Set the Fill color of your new Circle to a bright yellow color. (I used the third swatch on the third row).
How did you do? To check yourself look at Figure 30 which shows the state after step 76.
Adding another Ring of Shapes
Now let's add a new Ring of Shapes. I'll give you a few more hints here.
77. Deselect.
78. Set the Shape Popup in the Shape Palette to "Ring of Shapes."
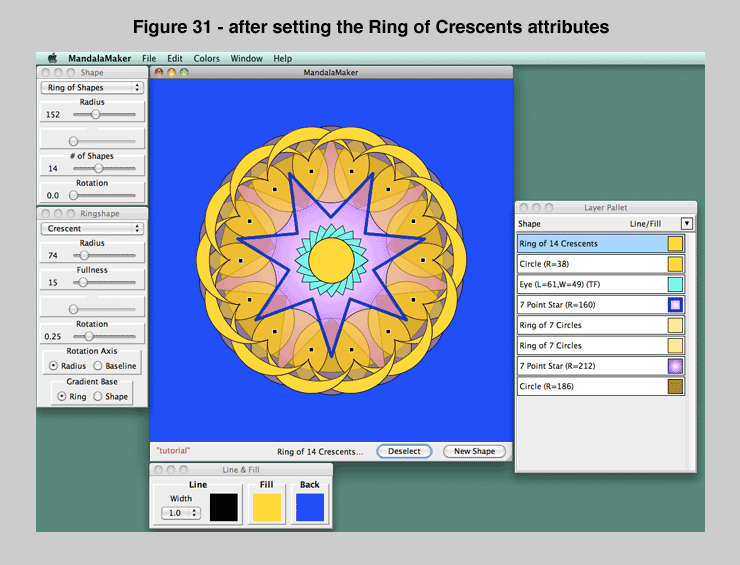
79. Set the Shape Popup in the Ring Shape Palette to "Crescent."
80. Set the attributes in the Shape Palette as follows: "Radius" 152, "# of Shapes" 14, "Rotation" 0.0. Set the attributes in the Ring Shape Palette as follows: "Radius" 74, "Fullness" 15, "Rotation" 0.25.
81. Click the "New Shape" button.
Figure 31 shows the state after step 81. Notice how the settings we used have neatly interlaced the Crescent shapes with their points just touching each other.
Creating a New Fill Color
Sometimes the colors available in the Paint Palette do not provide the exact color we want. At these times, we can create a new color using the Color Picker.
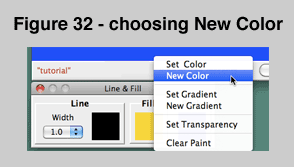
82. Click on the Fill swatch on the Line & Fill Palette and choose "New Color" from the popup menu to open the Color Picker.
Figure 32 illustrates choosing New Color.
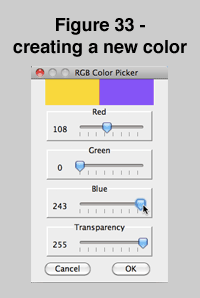
83. Use the sliders on the Color Picker to create a deep purple color. I used the following settings: "Red" 108, "Green" 0, "Blue" 243, "Transparency" 255.
Figure 33 illustrates creating a color in the Color Picker.
84. When the color is created to your liking, click the "OK" button on the Color Picker to close the picker.
Setting Line Width and Color
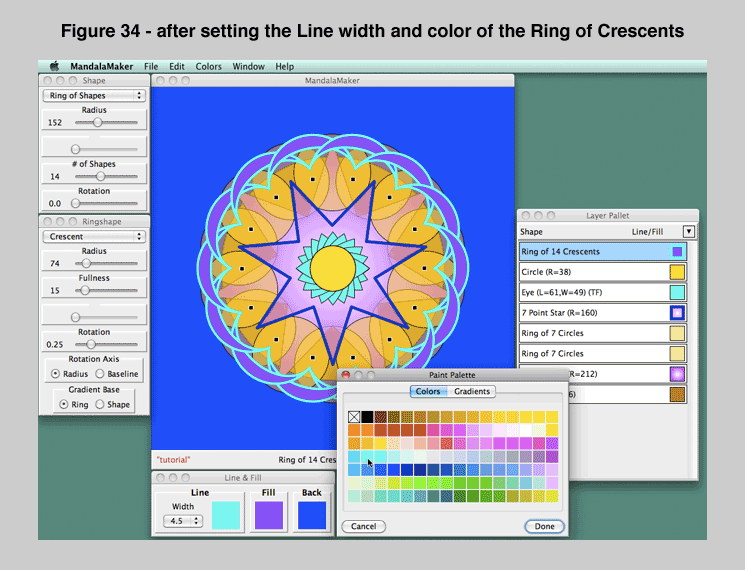
85. Set the Line Width of the Ring of Crescents to 4.5 using the Line Width popup on the Line & Fill Palette.
86. Using the "Set Color" command on the Line swatch's popup menu, set the Line color to a light blue color. I chose the second swatch from the left on the fourth row.
Figure 34 shows the state after step 86.
Editing a Previously Added Shape
Looking at our drawing now, I feel that the center Circle needs to be stronger. Luckily we can edit any shape in our mandala at any time.
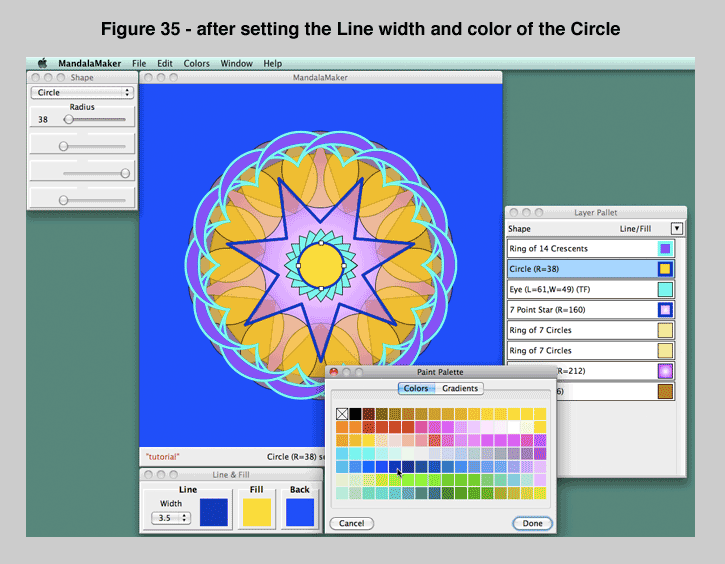
87. Place the cursor inside the central yellow Circle in your mandala and click the mouse button to select the Circle.
88. Using the Line Width popup of the Line & Fill Palette, set the Line Width of the Circle to 3.5.
89. Using the "Set Color" command on the Line swatch popup menu, set the Line color of the Circle to a dark blue color. I used the fifth swatch from the left on the fifth row.
Figure 35 shows the state after step 89.
A Final Flourish
90. Deselect the Circle.
91. Set the Shape popup on the Shape Palette to "Yantra" and set the "Radius" to 25, the "# of Triangles" to 9, and the Rotation to 0.0.
92. Click the "New Shape" button to add the Yantra to our drawing.
93. Set the Line Width to 1.0.
94. Using the "Set Color" command on the Fill swatch popup menu, set the Fill to a violet color. I used the last swatch on the third row.
The Line still seems a bit strong, so let's get rid of it altogether.
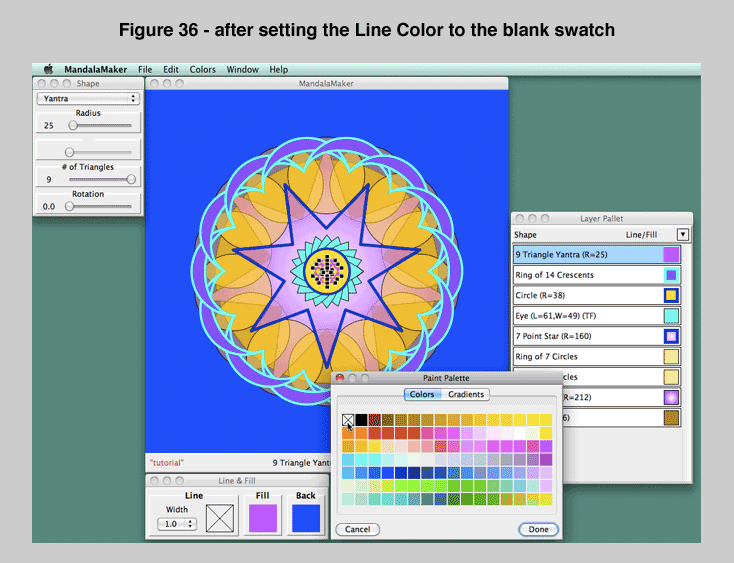
95. Choose "Set Color" from the Line swatch popup menu and then click the blank swatch in the upper left corner of the Paint Palette to remove the Line from the Yantra.
Eliminating the Line from a shape can also be done by choosing Clear Paint from the Line swatch popup menu.
Figure 36 shows the state after step 95.
Finishing Up
96. Click the "Deselect" button on the Task Bar and admire your hard work!

Have you been remembering to save your work as you went along? You should certainly save it now.
Using the Save command creates a file which only MandalaMaker understands. If you want to use your image in another program or project, you will need to use the Export Image… command to create a JPEG, PNG or GIF file.
97. Choose "Export Image…" from the File Menu to open the Export dialog box.
Figure 37 shows the Export Dialog.
98. We can leave the settings in the Export dialog as they are, and just click the "Export" button.
99. In the system Save dialog that appears choose a name and a location for your exported file.
Feel free to add additional shapes or edit your image in any way you choose.
100. When you are finished working with MandalaMaker, shut down the program by choosing the Appropriate command. On Windows, choose "Exit" from the File Menu. On the Mac choose "Quit" from the Application (MandalaMaker) Menu.
This concludes the tutorial. I hope you enjoyed creating your first MandalaMaker drawing.
 HOME
HOME